October 14, 2013

Oatmeal Gnocchi


Welcome back! I know it's been a while since the last post, but I assure you that this post here will make up for it!

What you are looking at is as simple as the title states. Oatmeal prepared in the fashion of gnocchi. Now, before you completely freak out, let me address a few questions you are probably asking yourself right now.

1. What the fuck is Oatmeal Gnocchi? Be patient and I will show you.

2. Are you fucking kidding me? No, I am not.

3. What in the hell would possess you to make Oatmeal Gnocchi? The simple answer is David Chang. The longer answer is I wanted to play with oatmeal.

Question 3 was actually asked to me by a coworker when I told her that I made this. I won't say her name, but I loved how blunt she was about it. :)

In all honesty, turning oatmeal into gnocchi wasn't my initial goal. My goal was to simply play around with an ingredient that was inexpensive and had sort of a bad reputation. If you think about it, most people only see oats in a couple forms, as either a porridge or in cookie form. But how could something so good be held down to just two ways of preparation? It was that line of thinking that had my mind racing in trying to figure out other ways to use oatmeal.

For some reason, I had it in my head to start with using fully cooked oatmeal. And when I say fully cooked, I mean FULLY FUCKING COOKED AND SEASONED, with butter, brown sugar, and all that good shit!

After cooking the oatmeal, I poured it into the food processor and blended the hell out of it until it was as smooth as it could get.

Now, my first experiment was actually oatmeal pancakes. I used a 50/50 ratio of the blended oatmeal and pancake batter. 

The pancakes came out ok at best. You could get the flavor of the oatmeal, but they were a little on the dense side. Here is a pic of the pancakes:

After remembering how David Chang turned ramen into gnocchi, I figured I could give it a try. I started with roughly 1 cup of the cooked oatmeal. I added 2 egg yolks and approximately 1/4 cup flour and mixed until combined. The amount of the flour may vary. I kept adding flour until the mix turned into a goopy-like state. In other words, it should be thick enough to slowly fall off a wooden spoon, like GOOP!

The amount of flour in the picture above is not 1/4 cup. I added more flour after this pic.

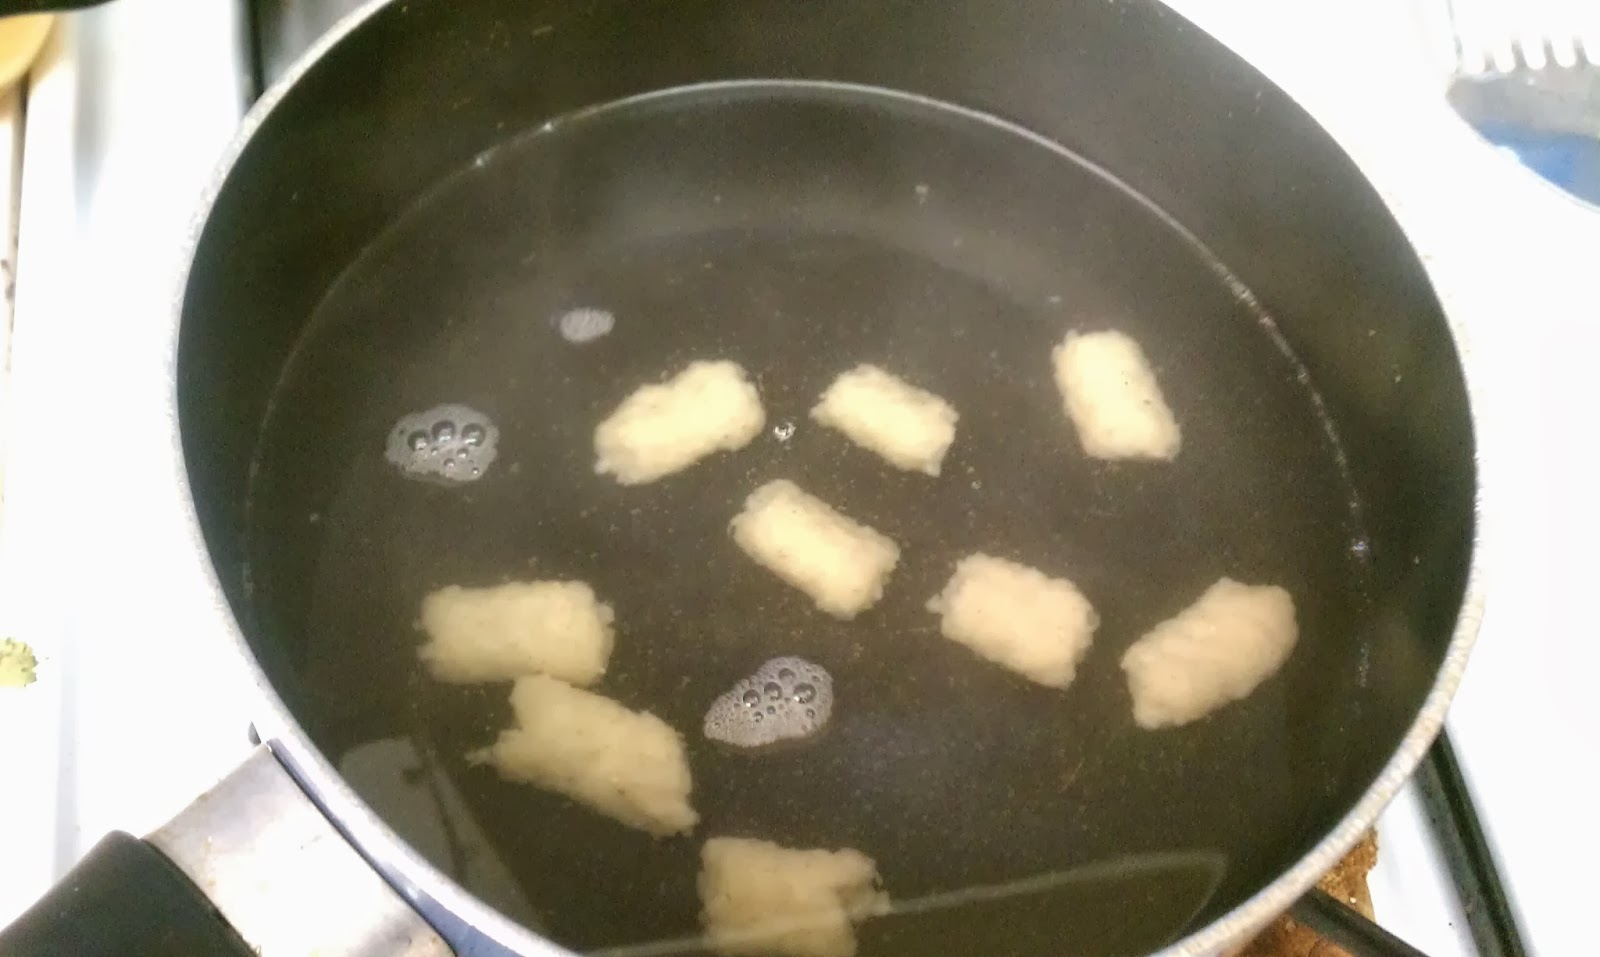
Once combined, I placed the mix in a zip lock bag and let it chill in the fridge for a half hour. When the mix had cooled, I heated a pot of water to a simmer. I then cut off a corner of the zip lock bag and piped in the mix. I used a butter knife to cut the mix into small pieces as it was going into the water.

From here, I cooked the oatmeal like gnocchi. Once they started to float, I cooked them for another 30 seconds and then removed them from the water. I placed the poached gnocchi in a pan with a little vegetable oil to prevent them from sticking.


At this point, I got a saute pan to medium heat. I added a little vegetable oil to the pan and dropped in some of the gnocchi. Once in the pan, I didn't move them around much, to let them develop some color and crunch.

At this point, when the gnocchi were almost done, I dropped in a little butter and brown sugar to give the gnocchi some added sweetness. When all the gnocchi had a nice, sticky glaze, I turned off the heat and removed them from the pan.

I didn't have any crazy ideas for a plate-up, so I just kept things simple. I piled them in the center of plate and drizzled some maple syrup around it. DONE.

There was something really cool about this oatmeal gnocchi. I first tasted them right after I removed them from the pan. They were sticky and sweet, with that tender texture of oatmeal that we all know. Then, as it cooled down, something happened. That sticky and sweet outside began to harden, and created this crispy shell around each gnocchi. They were a little reminiscent of mini french toast sticks, except they were oatmeal. It was really delicious!

Since I still had some gnocchi left over, I figured I would try it without the brown sugar glaze. So, I sauteed the gnocchi on both sides and left it at that. I brushed some blueberry syrup on the plate first. I dusted the gnocchi with powdered sugar on a separate plate before placing them on the plate with the syrup. And that was that.

One more picture, for the road.

Without the brown sugar glaze, they didn't have as much sweetness or the crunchy shell. But, it still had some crunch on each side from the saute. Personally, I liked this approach a little better. I was able to control how much sweetness I wanted with my oatmeal gnocchi. While the stripe on the plate may look nice, I still had a shot glass of syrup on the side to dip my gnocchi in to.

Overall, I felt this oatmeal experiment was a success. I remember telling a coworker that this is the kind of meal you make someone when you are trying to get laid.  It can look beautiful and taste delicious, all the while being cheap and easy to make. Guys, this is the post you want to bookmark!

That's it for this one. I hope you enjoyed it and will give this one a try. If you have any questions or comments, please feel free to drop a line at the bottom of the page.

Take care!

September 16, 2013

Meatballs Over Rice


Hi Everybody! It's time for another wonderful blog post by yours truly. As you can tell by the title of this post and the picture above, it's pretty easy to figure out what this one is all about. The truth is, there is actually more going on behind the scenes than you might believe.

The original title I wanted to use for this post was "Cooking Without Recipes". I was just going to explain how when it comes to hot foods, I usually don't follow recipes and just wing it. I would then list a bunch of tips that help me in the kitchen. Then I remembered that I hate "Tip" blog pages. In my opinion, a lot of Tip pages come off a little preachy. I usually leave a comment on the page like "I've got a tip for you! Go Fuck Yourself!!!"

Plus, I feel like I'm not really good enough to be telling people what they should be doing in the kitchen. The only thing I really suggest is to simply relax and have a little fun with it. If all else fails, just keep it simple.

What I have for you this time around can be enjoyed as a either a light appetizer or a full meal. Just use a smaller portion for the app.

For the rice, I started by sauteing some white onions with yellow and red bell peppers. A little salt and pepper to season.

Sorry for the blurry pics. Anyway, when the veggies cooked down a bit, I added a few tablespoons of Oyster sauce. When it looked like the veggies had soaked up some of that sauce, I added some pre-cooked basmati rice. Stir well and season with a little more salt and pepper. I added cumin as well, to bring a little smokiness to it.

When the rice is almost done, add a couple handfuls of fresh spinach and mix it in. This step should be done right before it hits the plate.

When it comes to the meatballs for this dish, it's really the last part of cooking that is the most important element this time around. Honestly, you can prep the meatballs anyway you like. I kept it pretty simple for the most part. I used ground beef and added Worcestershire sauce, bread crumbs, salt, pepper, hot sauce and five spice powder.

I rounded the meat in to balls and placed them on a baking sheet. The went in to the oven at 375 for about 10-12 minutes.

Now it's time for that last, crucial element with the meatballs. Place some of the meatballs in to a hot pan and pour a little barbecue sauce in the pan. Cook the meatballs in the sauce until the sauce has reduced down a bit and each meatball is well coated.

This time around I used Korean barbecue sauce. For me, the best sauce to use for this is Hoison. The Hoison sauce will reduce and create a sticky, crunchy shell around each meatball. I didn't have any on hand, so I went with the Korean sauce.

From here, all you have to do is plate up.

I added a little cilantro at the end to make it all fancy. Did it work?

And there you have it. There really isn't too much to this dish. Half of it involved left-over rice, and the other half was fuckin' meatballs!

This is the kind of stuff that keeps me interested in cooking. Simple food that can make you smile and fill you up.

Oh yeah, it tasted pretty damn good!

I'm out.

September 4, 2013

Custard Pie


Welcome back to my little corner of the world wide web. What I have for you today is as simple as the name of the dish itself. Custard Pie. And that's exactly what this dessert is. Custard baked in a pie shell.

While the dessert itself is rather easy to prepare, there are a few little tips and tricks you can do to ensure that this dish is the best it can be. Before we get to that, lets start with the basics: The Recipe.

Honestly, there are so many recipes of this dessert online, I feel like I don't even need to post it. Most of the recipes I found were only different by the smallest variation, be it a few ounces of sugar or milk. But, I don't think it's fair to the reader to not know what I used to get the results I achieved. So, here it goes!

Custard Pie

1                    9 inch pie shell

2 1/4 cups     Milk
1/2                Vanilla bean, split and seeded

2                   Eggs
2                   Egg yolks
3/4 cup         Sugar
                     Freshly grated Nutmeg

If you don't have any fresh vanilla bean, you can add a couple teaspoons of good vanilla extract in place of the bean.

This first step is really for using the vanilla bean. If you don't have the bean, skip this step.

Start by slicing your vanilla bean in half and scraping out the seeds with your knife. Place the pod and seeds in a pot with the milk and bring it to a simmer. When you see the milk start to steam, turn the heat off. Stir for a second to mix the vanilla seeds around, then let it rest for at least 15 minutes. Doing this will create a stronger vanilla flavor.

Now it's time to pre-bake the pie shell. First, spray your pie tin with non-stick spray. I used a French tart shell because I like the appearance a little better. 

Once sprayed, Lay down your pie dough and make sure to press it in all the nooks and crannies. After you trim the edges, get a fork and punch a bunch of holes in the bottom to keep it from rising too much. Bake at 350 degrees for about 10 minutes. You want it to be a light brown. Remember, it's going back in the oven later.

Now, the rules of baking say you need to weigh down the center with beans or pellets. I didn't do that because I was being lazy. When it came out of the oven, it did bubble in the center, but I just pushed it down with my hand while it was still hot. It turned out just fine.

With the shell done, it's time to make the filling. Crack your eggs and egg yolks and mix well. Stir in your sugar and mix until combined. 

Take out the vanilla pod from the milk and stir the milk into the egg mixture slowly. Once that is mixed, you are almost done.

Pour the mix into the cooked pie shell and bake.  I sprinkled fresh nutmeg over the top before baking, but this can be done after baking. 

Most recipes will call for you to bake this at 350. I baked mine at 325 to be on the safe side. 

After about 28 minutes or so, the pie was done. To check to see if it's done, give the tray a couple taps. It will jiggle slightly, but stop quickly. If it needs more time, it will jiggle, but look watery.

If you look at the picture above, you can see it's a bit wavy at the bottom of the pie. When I took it out, it had puffed up like a balloon  in that section. I don't know why it did that, but it didn't make much of a difference in the end.

After letting the pie cool and making some whipped cream, it was time to eat.

A little more fresh nutmeg on top and this baby was ready to go.

This thing tasted great! The nutmeg and vanilla shined through. The texture was creamy, while the pie crust was still crisp. Pre-baking the shell really helps.

As good as it was, the real treat didn't come until the next morning. I woke up and got a small slice to start my day. This pie tasted even better cold! 

Well, that's really about. I know this one might have seemed a tad long winded, but it's really easy to make. If you have any questions, please feel free to leave a comment and I will get back to you.

Oh yeah, Custard Pie is also the name of a pretty good Led Zeppelin song.


I'm out.

August 21, 2013

A Lunch Of Korean BBQ


Glad you could make it back for another round of food blogging. Sorry I have been so negligent with the blog lately. Seriously, if this blog was a puppy, it would have starved to death by now. Don't worry, it would have at least gotten a proper burial. No garbage bags into the ocean like my boy Dexter!

Anywho, late last month, a couple coworkers/friends treated me to lunch for my birthday. The spot was a Korean BBQ house, and all of us were looking forward to some good food!

The handsome gentleman on the left is Richard, and the gorgeous lady on the right is Sue. I consider the both of them great friends and great all around people. If I see both of them at work, I know the day won't be that bad.

Over the last weekend, Sue went from being single to being married! Congratulations Sue! I wish nothing but happiness for you and the hubby!

Back to the lunch!

To start, I'm no expert at Korean BBQ. My knowledge is limited to the few experiences I've had with it. If you have never tried it, my advice is to find a place near you and try it immediately!

The place we went to had an All You Can Eat deal. For about $17, you are given a list of meats and seafood you can eat. You start by ordering 3 items. The server will bring them to your table, and from there, you cook your proteins right there at the table. After some time of cooking and eating has passed, your server will come back ready to take an order for more food. From here, the cycle continues.

The picture above does tell a detailed story. First, you have the star of the show, the grill located in the center of the table. The server will turn this on for you and set it low enough so even the worst cook won't be able to burn anything to a crisp. With 3 cooks at the table, plus Sue being the Korean BBQ expert, we had nothing to worry about.

The next thing that catches your eye in the picture is all these little fucking plates! I guess it's a normal part of the Korean dining experience. The last place I went to for Korean grub had the same deal with a lot of little dishes with sides and condiments. There is absolutely nothing wrong with it, but it can seem a bit overwhelming to the uninitiated.

Once all the food hits the table and you start cooking, that's when it hits you how cool it really is. It stops feeling like a restaurant and starts feeling like a buddy's backyard cookout. Just being able to laugh and joke with your friends while one of you is tending the grill just brings up a myriad of feelings and memories. And just as you are feeling uplifted with the vibe, the food brings you to a place of pure delight.

Of course, I can't remember all the things I had that day. Some of the things I can remember are beef tongue, baby squid, octopus, spicy pork, brisket and a few more tasty treats that had all of us making those wonderful little moans you make when eating really good food!

I think it was after the third round of food from the server that all of us were stuffed and ready for a nap. I think we were there for almost 2 hours. Just cooking and chatting, enjoying the moment like only good friends can.

Yeah, it was a good time. :)

Incheonwon BBQ House
13321 Brookhurst St
Garden Grove, CA 92843
(714) 638-9292

I'm out.

August 10, 2013

Haus Of Pizza


What's going on people!?!? I hope all of you are doing well out there. I apologize for the extended gap between posts. Life has been throwing me one curve ball after another. While I don't like making excuses, I will say that my want to sit down at the computer and write has been fleeting. Until now, that is. Today, I feel like writing. Today, I want to sit down and share a little piece of my life with the world.

In my neck of the woods, most of the Italian food sucks balls. I'm not going to name names, but most of the Italian food in Garden Grove is bland, lacks any type of depth, and isn't worth the money you are spending. Because of this, I tend to just make my own Italian food.

A few weeks ago, a friend invited me to lunch at a small pizza place in Costa Mesa called Haus Of Pizza. She said it was really good, but I still had my reservations. With all the lack luster food I've tried recently, I wasn't expecting much.

I didn't know anything about this place, but when you walk in, it automatically has that feel of a place that's been there a long time. There is all kinds of shit on the wall, and I say that in the most lovingly way. The walls look like it started with one or two things, and over time, they just kept adding to it!

When we sat down, the server dropped the menus off and gave us a few minutes to look it over. I was in shock as to how low everything was priced. Especially in Costa Mesa! It seemed like most of the menu was around 5 or 6 bucks.

My friend told me the pizza was really good, but, I wasn't really in the mood for pizza. I saw that they had a meatball sub and wanted to order that. My friend, being the stubborn little stinker that she is, was very insistent that we try a pizza. So, we agreed to split the sandwich and the pizza.

When the food came out, I was surprised and excited with how good it all looked.

Can't forget about the pizza!

Personally, I'm very picky about meatball subs. There's only a few places I trust to make it right. But, if this place was any kind of decent Italian eatery, their meatball sub couldn't be that bad. Was I ever surprised! This sub was fucking ridiculous! The meatballs were tender and full of flavor. The sauce was on point. You could just taste the time and love put in to it. But, the best part was all the wonderful melted cheese on top. When they put the cheese on there and place it in the oven, something happens that just moves a sub from good to great. The cheese gets all stringy, the edges of the bread get all toasty and crunchy. GODDAMN that sub was good!

The pizza had artichoke, sausage, and....a bunch of other shit I can't recall. Yes, the pizza was good, and any other day, I would be going into detail about it. But that sub was a monster. Everything else got shoved to the side after one bite of that delicious meatball sandwich.

I can't remember much after diving into that sub. I know I thanked my friend for telling me about this place. After that, it's all a blur. Oh well.

I hope you enjoyed this partially remembered story. Next post, I'll try and write something I can remember better. No guarantee on that last part. :)

Haus Of Pizza
1500 Adams Ave.
Costa Mesa, CA
(714)751-8777

I'm out.

July 30, 2013

Zito's Pizza


Welcome back! This is the first post since completing the Thirty Straight Days Of Blogging adventure. Let me tell you, that was quite the blogging work out! I don't know how people put out quality posts everyday and not go completely bat-shit crazy.

Since then, I've had time to live a little and let the battery recharge. In that time, I've tried some really good food, experimented with desserts in hopes of creating new dishes, was treated to Korean BBQ by wonderful friends, and have seen homeless people park their shopping carts like cars. Don't believe me about that last part? Check this out:

I'll probably burn in hell a few weeks for this, but I found this very amusing!

Anyway, this blog post isn't about how well homeless people can park their shopping carts, it's about pizza. Good pizza, for that matter! I just so happened to find some good pizza at Zito's Pizza. Let me tell you all about it...

During a day off from work, I hopped on my bike and let the wheels go wherever they wanted to go. I got on a major street and decided to ride until I found a decent place to hang out and rest. Whether it be a Starbucks or a strip club, I was going to find comfortable surroundings.

About 45 minutes in, I came upon Zito's. It looked like a decent place and the sign said it was New York style pizza. Plus, they had a "by the slice" deal for lunch. I didn't need anymore encouragement at that point.

When you walk in, the place has a sports bar feel to it. All the TV's had some sort of sports show going on and there are team banners as far as the eye can see. All the tables are large and are made for a lot of diners. But, it didn't have a grimy feel like some sports bars. Definitely family friendly, as there were about 4 or 5 kids there when I was there, not to mention a mini arcade.

After checking out the menu, I ordered mini corndogs, 2 slices of pepperoni and a drink. I know it seems like a lot, but a lot of NY style pizzas can be on the thin side.

First up was the corndogs.

These things tasted like corndogs should taste. Crispy outside with a hot, juicy wiener in the center. I do love me some hot and juicy wieners in my mouth!

A few minutes after the corndogs came out, I got my pizza. I can easily say I was diggin' the way they looked.

I picked up the first piece, and I could feel that the bottom of the slice was nice and crisp. That is such a beautiful fucking thing with pizza!

As I took my first bite, I could feel the cheese pulling away from the rest of the slice. The pepperoni had the slightest crunch to it around the edges. The sauce was seasoned well and not too sweet. The dough did have a bit more chew than expected, but it wasn't tough. It tasted like real pizza dough, not the shit you normally get from the more famous pizza chains.

The overall taste was great. Everything tasted really good. There really isn't anything else out there like a fresh slice of pizza.

Of course, I burnt the roof of my mouth pretty good after that first bite. After a sip or two of soda and scraping the dead skin out, I continued eating.

This picture above represents the point in time in which I realized that I ordered way too much food and was going to have pedal my ass out of there. Like I said earlier, I ordered two slices in case they were thin. Well, they weren't. I wasn't going to waste it, so I finished the slice. Luckily, there is a Starbucks a couple hundred yards away. I rode there and hung out a while to let the food settle.

And there you have it. I know pizza is a really common thing, but good pizza is far from common. My advice for you is to tell the major pizza chains to go fuck themselves and find a place like Zito's to get a real slice.

Zito's Pizza
1716 W. Chapman Ave.
Orange, CA 92868
(714) 939-1111

I'm out.

July 9, 2013

T.S.D.O.B: Day 30 - CRONUTS!!


It's here. The final day of Thirty Straight Days of Blogging is upon us. While there is no Rocket Gibraltar to send these past blogs off to Valhalla, I figured the best way to end this journey would be with a sweet finish. And what better way to do that than with donuts. But these aren't just any donuts. These are deep fried rounds of croissant dough, better known today as Cronuts.

If you haven't heard, Cronuts are all the rage right now in New York. People are standing in line for hours just to get two or three of these things. There are reports of people paying up to $40 each on the "black market". But, in every article about these cronuts, there was one thing that everyone was saying: They taste absolutely incredible.

When I heard about them, I was surprised it took someone this long to deep fry croissant dough. I thought it would have been done by now. I like croissants, so I figured they would taste good. When I thought about making it myself, I quickly said "Fuck That!"

For those of you that don't know, croissants are extremely time consuming to make. Most bakeries these days just bring in frozen, pre-rolled croissants to save money on time and labor. The last time I had to make croissant dough, I was in culinary school. When I started talking to coworkers about making it, most of them said they hadn't made it since school either.

Realizing that this would also test my measure as a chef, I knew I had to step up to the plate at some point. To quote Rage Against The Machine, "What better place than here, What better time than now?"

To begin, let me say that this is NOT a tutorial on making croissant dough. This is just my experience with making the cronuts.

Secondly, these didn't come out perfect. I made mistakes, but nothing so costly that it didn't work out at all. Hey, it's been over a decade since I've made croissant dough.

Lastly, if you are thinking about making this, make sure you start early and have no pressing plans for the day. From start to finish, it took me about 5 hours to complete. You will find out why later.

Since this is more about the experience, I'm not going to bother with the recipe. You can find a croissant dough recipe all over the internet.

Enough of the chit chat. Let's get down to business!

Since it is a yeast dough, you start off the way you would any other yeast dough. Bloom the yeast in a bit of water and a little bit of sugar to feed the yeast.

Once the yeast was ready, I added a couple eggs and some vanilla extract and mixed well. Then I added the flour and pinch of salt and mixed until it started to climb up the dough hook.

Now, it was at this point that things started to go askew. I could tell the dough was very firm. From past experiences, I know the dough shouldn't be that firm. So, I did the best I could to knead it a bit more by hand before resting it.

It may be a little hard to see, but you can tell the surface isn't smooth. It should be smooth with a little give to it. I knew it wasn't quite right, but I thought with all the rolling coming later, it might be salvageable.

Just to be on the safe side, I went ahead and made a second batch of dough. I had all the ingredients, and if I was going to be doing this shit all day, I might as well do two batches.

I cut back on the flour with the second batch and it came out a lot better.

While the dough was resting in the fridge, it was time to make the butter block. The butter is the real key to croissant dough. You fold up all these layers of butter and dough to create all those little flaky layers that people love.


The butter itself needs to be chilled, but a little pliable.

Now, it's time to put in some elbow grease and start rolling.

I started with my first dough and tried to do a 4-sided fold to get the butter in there. It didn't work so well, to say the least. The block wasn't wide enough and I put too much flour on the dough, so it wasn't sticking to the other pieces of dough to form a seal.

Let me just say that the first roll is extremely important. If you don't seal in the butter properly, you will get a mess on your hands very quickly.

I opened the dough up and spread the butter to 3/4 of the dough. Then, I folded the non-buttered side over the buttered area. Then I folded the buttered side over the rest of the dough. I know, it sounds weird, but think of it as folding a piece of paper into thirds.

A soft roll, and then into the freezer for 30 minutes. After the thirty minutes, you take out the dough and roll it length wise until it gets to a thinner thickness. Then you do another 3-fold and back into the freezer. You have to do this 3 more times! Fuck!

Once you do the last roll and fold, you have to let it rest an hour before you can roll it out to cut your donuts.

I rolled out the dough until I felt I hit the right thickness. Somewhere around 1/2 inch.

I got a ring mold and cut out my rounds. I was able to get about 12 donuts from it.

The dough has to proof a little before frying. I didn't wait as long as I should have. At this point, I was getting impatient.

While waiting for the oil to get hot, I made a ganache and caramel sauce to dip the cronuts in.

When the oil reached 350F, it was time to get frying. If you want to flip the things with ease, use a cheap pair of chopsticks.

I first tested the oil by frying a few of the donut holes. It only took a minute or two, and they didn't seem like they were burning. With that, It was time to drop in the rings.

It took a minute or two per side and that's it.

With donuts, it's always best to glaze them shortly after you take them out the oil. The heat helps the glaze adhere.

After letting them cool a couple minutes, it was time to eat. I tried one with ganache first. It has a crispy outside, almost like an old fashioned donut. But, the texture inside is different. It's soft and rich. Not oily at all. I have to admit that it is a damn good donut! I wouldn't pay $40 for one, but it certainly worth a wait in line for.

Also, I fried up every bit of dough that was there. NOTHING was wasted! With that much time invested, you need to use every last bit of dough!

Since it was my day off, I figured I would be nice and bring some to my coworkers who knew I was going to make it. OK, that's not entirely true. If I didn't bring any to work, I would have gotten my ass kicked and locked in the walk-in freezer. So, I hopped in the car and made a special delivery.

When I arrived, it only took a matter of minutes before they were all gone. Everyone seemed to love them. And to make a bunch of pastry chefs happy with a pastry is no small feat. I was feeling pretty good at that point.

We couldn't finish the rest of the donuts at home. The next day, the cronuts resembled rocks more than donuts. They have a short shelf-life and should be consumed within the day of making them.

I wish I would have taken more pics, but by the time I got to frying them, I wasn't worried about that. I just wanted to be finished.

And there you have it. The end of this wonderful journey is here. The last 30 days have been a blast. I've talked about a lot of things I've had on my mind for a while. I've shared a little more about myself than I previously have. All in all, I hope you, the reader, has taken something out this.

I'd like to thank all my friends and family who have been supporting me throughout the years. All my friends on Facebook and Google+ who have taken the time out their day to stop by my little corner of the internet and read what I have to say.

With that said, it's time to take a short break from the blog. I'm thinking two weeks, but it might not be that long. I need a little time to recharge the battery and let life happen again.

So, the only thing left to say is....

I'M OUT!

T.S.D.O.B: Day 29 - Chefs I Like


Only 1 post left of Thirty Straight Days of Blogging. I'm looking forward to the final post for a number of reasons. I think it's going to be a pretty good post, if I say so myself. More importantly, I'm going to complete a challenge I set for myself. As fun as it has been, it's also been a bit tough this last week and a half. Lots of work and outside issues have made getting these last few posts tougher to do. Even now, I have to finish this post asap so I can build a propane grill. All in all, it's been a hell of a ride that I don't regret for a second. If anything, I'd be willing to do it again.

For now, I'm just going to give a little insight to a few chefs that have inspired me along the way. The chef above is Jacques Torres. He's a pastry chef that just fucking rocks. His medium is chocolate, and he just makes it look so easy. I first read about him when I was in school and was lucky enough to meet him years later. He was very laid back and liked to laugh whenever possible. Just a good guy.

Another chef that inspired me in school was Ewald Notter.

While Jacques was the king of chocolate, this guy was the king of sugar. His sugar work can best be described as art masterpieces. The way he works with sugar is the way guys like Joe Satriani and Steve Vai work with a guitar. I always thought he did spectacular work, but I didn't truly appreciate it until I started working with sugar myself. When you begin to understand how much time and practice it takes to get comfortable with it, you start to understand just how much time and dedication it takes to reach that skill level.

Another pastry chef that I really like is Elizabeth Falkner.

You may recognize her from numerous appearances on Food Network, which is where I first saw her. It wasn't until I read her cookbook in which I gained a lot of respect for her. Her ideas and presentation of the food is truly inspiring. She is taking classic desserts and bringing unique twists to them in a very modern approach. Her plate-ups are clean and elegant. Just knowing that there is a chef like this out there makes me want to step my game up.

When it comes to having a passion for cooking, the first chef that comes to mind is Rick Bayless.

While Mexican food is not a strong suit for me, seeing this guy throw down in the kitchen always gets my fire lit. The love he has for cooking and creating dishes just pours through the screen. A blind man could see how much he loves what he is doing. He is another one that makes everything he does look so easy. Plus, he has a crepe recipe that works so well, I'm extremely hesitant on using other recipes.

These are not the only chefs that have inspired me. In fact, the chefs that have helped me become the chef I am today, you have never heard of. I have been lucky enough to have been taught by and worked with some great people. People that have taken the time to show me the right ways to do things. People that have challenged me to be a better chef because they felt I had the skills to do so. People that have shown me what it truly means to be a Chef and how to lead a kitchen with integrity and maintain respect from all the cooks.

To all of the people that have helped shaped my culinary career, I say Thank You. Your lessons haven't been forgotten. 

That's it for this one. Come back tomorrow for the big finale of Thirty Straight Days Of Blogging!